Rock Drilling Steps: From Pilot Holes to Using Reaming Drill Bits
It feels logical to start rock drilling with the biggest bit you can run—but that instinct is exactly what leads to overheating, binding, deviation, or even a seized tool. Large bits don’t cut faster; they fight back faster. The only reliable way to reach a clean, straight, full-gauge hole is to start small, stabilize the path, enlarge carefully, and ream with control. Every stage sets up the next, and skipping one means the rock—not the drill—will decide the outcome.
Rock drilling doesn’t reward force. It rewards sequence.
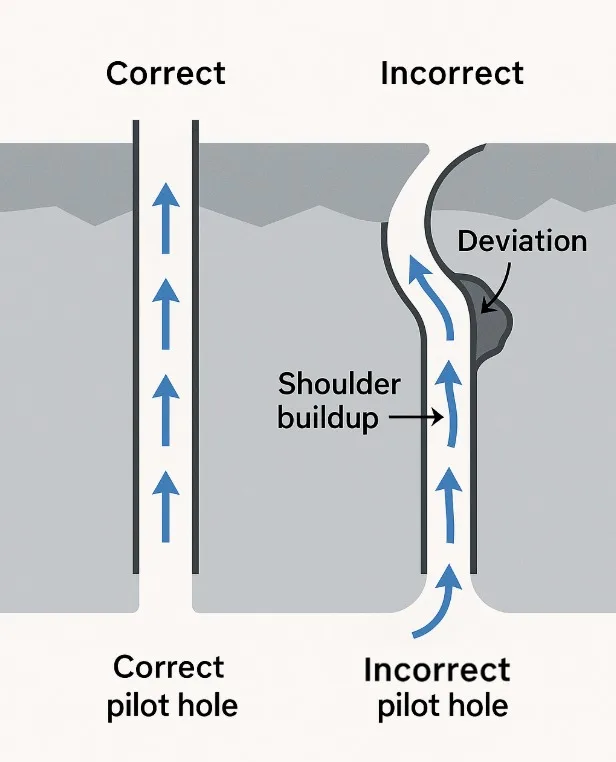
When Pilot Holes Fail, Everything Afterward Gets Worse
Most hole problems—binding, drift, shoulder formation—are not caused by reamers or rig issues. They’re caused by a pilot hole that wasn’t drilled correctly in the first place. A pilot hole is the line you commit to. If it wanders early, every larger tool will amplify that deviation. If dust isn’t cleared, it forms hard shoulders that reamers cannot pass. And if the bit overheats, the rock around the bore becomes brittle and unpredictable.
Many of these fundamentals are laid out clearly in step-by-step guide to drilling a hole in rock, which explains the operational details. But the reason pilot holes matter is simple: a poor pilot guarantees a poor hole.
How to Drill a Pilot Hole the Right Way
A strong pilot hole comes from respecting three essentials:
Use the right pilot bit for the formation.
Hard formations need stable, durable button styles. Softer rock allows more aggressive profiles. In fractured ground, you should keep the bit conservative—aggressive profiles “grab” fractures and cause wandering.
Balance thrust, energy, and flushing.
Too much feed pressure overheats the bit; too little causes bounce. Flushing—air or water—is your protection against dust packing into shoulders that will later block a reamer.
Stop at the correct depth.
A pilot hole is not meant to run long. It needs to be straight, stable, and deep enough to guide larger tools—not stretched to maximum depth for no reason.
A clean pilot hole is the single best investment you can make for the final hole quality.
Why You Should Never Skip the Enlargement Stage
Trying to move from pilot straight to final-diameter drilling is the most common rookie mistake. It almost always ends with binding or a stuck bit.
Enlargement is not optional because it:
- Removes shoulder material from the pilot
- Provides a smoother transition for the reamer
- Reduces torque spikes during diameter changes
- Stabilizes the bore for inconsistent formations
Skipping enlargement is like trying to widen a tunnel with one blast—you create chaos instead of structure.
Reaming Isn’t Just “Making the Hole Bigger”—It Fixes Invisible Problems
Reaming is the precision step. It does enlarge the hole, yes—but more importantly, it corrects shape, trims high spots, eliminates shoulders, and restores true gauge.
This is where reaming drill bit becomes essential. Reaming bits are engineered for stability: reaming wings guide the hole, gauge buttons maintain diameter, and airflow channels help remove debris before it compacts.
A well-reamed hole isn’t about speed. It’s about reliability and tool safety.
How Reaming Drill Bits Work(Engineering Breakdown)
A reaming bit has a very different job than a pilot bit:
- Reaming wings shave the shoulders and maintain direction
- Gauge buttons hold the final diameter against abrasive wear
- Balanced airflow lifts debris before it re-compacts
- Stable cutting structures prevent reamer bounce
Formation matters, too:
- Hard rock → hemispherical, wear-resistant buttons
- Abrasive ground → reinforced carbide
- Fractured layers → less aggressive wings to reduce grabbing
Reaming is a technical dance between the bit, the rock, and the debris removal system.
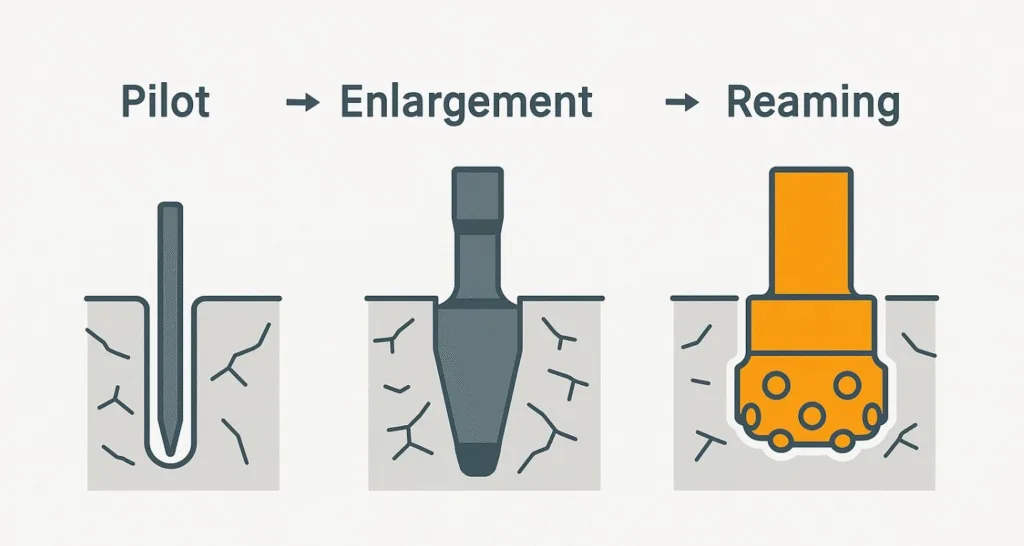
The Full Workflow: Pilot → Enlargement → Reaming
A clean, accurate hole comes from following this sequence:
- Drill a straight pilot
- Enlarge gradually to break shoulders
- Flush aggressively between steps
- Introduce the reamer with controlled thrust
- Monitor torque, vibration, and line
- Reach final gauge and verify smoothness
This workflow prevents the formation from “fighting back.”
Real Problems You Will Face During Reaming—and How to Fix Them
Deviation
Caused by uneven pilot or aggressive wing design. Slow down and stabilize.
Reamer jamming
Usually caused by dust-packed shoulders. Re-enlarge and flush again.
Overheating
Reduce RPM, check airflow, and inspect gauge wear.
Rock breakout
Occurs in brittle rock—reduce feed pressure and stabilize.
Flushing failure
The most overlooked cause of reamer bounce; increase airflow immediately.
Most reaming issues are not reamer failures—they are workflow failures.
How to Choose the Right Reaming Bit for Your Conditions
The perfect reamer depends on:
- Rock type(hard, abrasive, fractured, laminated)
- Desired gauge
- Wing aggressiveness
- Airflow capacity of the rig
In hard formations, durability matters more than cutting speed.
In fractured ground, stability matters more than shape correction.
In mixed layers, consistency matters more than any one parameter.
Tool selection is a decision—not a default.
Pre-Reaming Checklist
Before reaming:
- Pilot hole straight and stable?
- Shoulders removed?
- Flushing clear and strong?
- Reamer wings intact?
- Gauge wear acceptable?
If any of these fail, reaming will fail.
Conclusion
Rock drilling success doesn’t come from force; it comes from respecting sequence. A good pilot enables clean enlargement. Clean enlargement enables safe reaming. And safe reaming delivers a fully gauged, straight, predictable hole. Follow the order, and the job goes smoothly. Skip any part of it, and the formation will punish you—quickly and expensively.